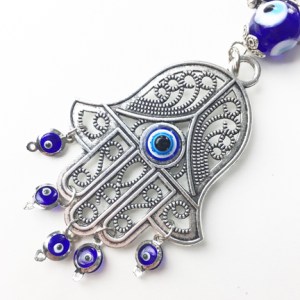
This week I had the opportunity to perform with a group of my proteges who have been taking private belly dance lessons. Each year, the Haunted HaflAdira features local dancers dressing up in costume to take the stage and dance for our community. As we planned our costumes, I found myself craving a light metallic pendant that would hang to my diaphragm. As you can see in this photo I decided to continue my hamsa motif and put together a double-decker pendent.

Above: Swirl, featuring Vakasha in Black and Gold, Davina in Blue, Zemira in Purple, and redvelvet in Rust.
More Jewelry? Yes Please!
I’m always tweaking my costume looks, and what I needed to fine tune this ensemble was a longer pendant. I wanted a piece that was large, had lots of movement and rested right where I wanted at the top of my diaphragm. With a few simple tools, and some basic jewelry componentry I created an assemblage piece from existing trinkets.
 Gather Your Jewelry Components
For this piece, I found three Turkish pieces all featuring the characteristic glass blue-eye designs. On the left is a door knocker or wall ornament, designed to be hung from the top loop on a nail or hook.
The keychain is a typical tourist trinket made from silver-toned pot-metal, but with the same swirling design and blue-eye details.
The last piece is a very tiny, delicate bracelet composed of the same blue eyes.
I also needed some chain to make this piece the length I desired and a clasp that would be easy to get it on and off in a hurry before and after a performance, but that was secure enough to hold the necklace in place.

Jewelry Making Tools
This pendant is made using basic jewelry. Pliers designed for jewelry making are smooth, so the pressure of the tool doesn’t mar the surface of the metal. Avoid using pliers from the hardware store, as they usually have serrated teeth to help keep a firm grip on projects.
Planning the Jewelry
I wanted a hand suspended from hand look with lots of movement and bounce. I want this piece to hang lower than the rest of my jewelry, wearing it suspended at the level of my diaphragm. This would allow me to bounce it with strategic body waves and chest lifts.

Disassembling the Jewelry Components
Once I have all the tools, parts and pieces together, the project only took a few minutes. I started by removing the big glass eye from the bottom of the door knocker/wall hanging piece. I also remove the top, leaving just a hand with four dangles. Next, I took apart the keychain, removing the key ring. Finally, I harvested 5 of the blue-eyed beads from the bracelet.
After I took those pieces apart, I’m left with this three items. A big glass eye, which I attached to the keychain, the top of the door hanger, and four beads left on the deconstructed bracelet.
Combine Jewelry with Jump Rings
The next step is to take all the disassembled parts and pieces and create a new pendant. I used the tiny blue-eyed beads and their original jump rings, to attach them to the tips of the fingers to hang like dangles. This mirrors the design of the door knocker/wall hanging piece.
I then attached this former keychain to the central finger of the wall hanging/door knocker piece. Overall, I am pretty happy with the way the new assemblage pendant looks.

Determine the Necklace Length
Once the pendant was finished, I put the costume onto my dress form and positioned the pendant where I wanted it to fall on my body. Because I like to make jewelry for performance, I always have a few spools of chain in my stash.
I put the pendant on the chain, and played with the position until I had it at the best length. I strategically choose this length so the top hamsa would rest right above my diaphragm. This particular style of chain has links that open, so it was just a twist of the wrist and I had the perfect length chain.
Add a Closure to your Jewelry Piece

The final step is adding a closure to the necklace. Although this piece is quite long and could easily go over my head, I always add a closure. I frequently wear large and complicated turbans or headdresses, and it’s really handy to be able to put a piece of jewelry on and off without disturbing my costuming.
Jewelry Making Tools and Supplies
Here are just a few of the tools and supplies I keep on hand in my studio for making custom jewelry as I need it. If you are into tribal style belly dance costuming, you may find yourself frequently using jewelry making techniques. For glam dancers, having these tools on hand means that you can make repairs on your rhinestone necklaces and bracelets. And of course, having the ability to redesign your jewelry to make pieces that are bigger and better is always a plus!

Basic Jewelry Making Kit: I started with a Beadalon Jewelry Toolkit similar to this one. I still use the chain-nosed pliers today, nearly 20 years later. What I love about this case, is that I can put my favorite closures and earring wires in the plastic organizer keeping everything together to grab and work without digging around for parts and pieces.

Jump Rings: I always keep a selection of different sized jump rings in my toolkit to have on hand to make repairs and create new pieces. Getting a set with six different sizes and a storage box means that not only will you be prepared, but if you run out of a particular size, you can buy replacements by the baggie to refill your organizer.
I had so much fun dancing with my crew in these bright robes and almost, but not quite, excessive jewelry. We had so much fun, we’re already planning for performances in December. Looks like there will be more jewelry making in my future!
Best of luck on all of your costuming and dance adventures!
Dawn Devine ~ Davina
Oct. 27, 2017
PS: If you enjoyed this post, why not share it with this image on Pinterest? And tag me if ya do!


 When a continuing client comes to me and asks for a costume, and doesn’t particularly know where to begin, I will pull out some of these pre-planned kits to show them what is possible. I like to share with them a mood board that catches the color story, texture, and vibe that I envision for the costume I intend to create from this kit. Having all the materials together can help non-sewers imagine what a final costume will look like.
 e top of it. This eleimantes the stress of having to create the body proportions and form. You can dive straight into the drawing of the costume. For this quick sketch, I started with this line art from the book “Becoming a Belly Dancer: From Student to Stage.” Available on


